
A great exercise for communities getting together to support our wildlife.
Depending on access to tools, spare parts and experience please allow two hours for this project.
Parts
Can be found for free or are available to most resourceful enthusiasts.
One possibly two fence palings. Recycled palings are fine: un-split, de-nailed, with no stains or paint at least on one side of each paling. Hardwood palings preferred, certainly not treated pine palings. 1 x Back plate - 650mm; 3 x 450mm (2 side walls and 1 front plate)
6 x 15-25mm screws. These are only used as points to wrap wire around, to secure lids.
40 bullet head nails or brads from a nail gun, 20-25mm long: thin enough not to split palings.
2 pieces wire 350-400mm long narrow gauge: used to secure top and bottom lids into place.
1 piece wire 5mm dia. 350-400mm long: to use as mounting hooks for the webbing around the tree.
1 piece natural wool carpet 270mm square with hessian backing: for insulation over colder periods.
1 piece weather-proof timber approx. 170 x 170 mm per lid.
1 piece of UV-stable webbing 20mm wide and approx. 1.5m long, with small loops sewn each end or heavy duty wire threaded through hose tubing for placing box in a tree.
Construction
Box assembly
Ensure naturally weathered surfaces are on the inside of the box. Position side walls between front plate and backplate with the backplate on the bottom. Box shape is now formed, with lid ends flush and side walls aligned.
Through the front plate, first nail each end on one side to keep aligned, then add 5-6 nails along the side walls. Repeat nailing process on other front plate and side wall.
Turn the box over and repeat nailing process, back plate to side walls.
Hint: Keep an eye on your nails not to be exposed inside the box or the bats may be injured.
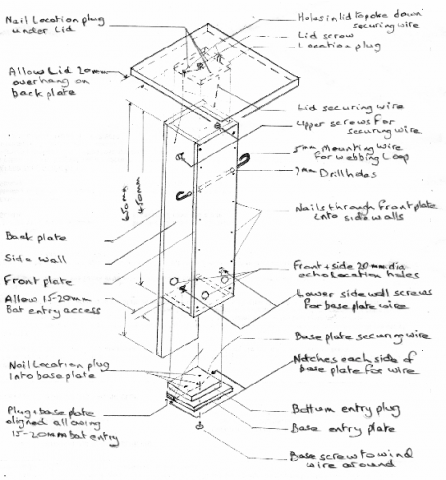
Top access lid and location plug
Cut the location plug to fit snugly inside the box. Then cut a lid with an overhang of a minimum 30mm each side and front of the box.
With 20mm overhanging the backplate, nail location plug centrally onto the lid.
Bottom bat entry plate and plug
Cut the location plug snugly to fit inside the box, leaving 15-20mm gap for bat entry access, between base plate and plug.
Next, cut bat entry plate, allowing a timbers width around 3 sides of the plug. Nail plug onto entry plate, leaving the 15-20mm bat entry opening between the base plate and plug.
Hint: Warped fence palings, may need a little rasping to allow the snug fitting of plugs into box.
Box built - Now it’s time for the screws, wires, notches, carpet and echo location holes.
The (4) sidewall securing screws are placed slightly forward of centre along both sides approx. 40-50mm in from top and bottom ends. The other (2) screws are to go externally into the centre of the top lid and bottom bat entry plates. Leave the head and a little of the shank exposed to wrap wire around, leaving no points inside.
With the lid in place, drill two narrow holes through the lid to allow the securing wire down to the upper side screws. Wind a length of narrow wire once around the lid screw, push wire ends down through the holes to the upper side screws and twist once around to hold.
Drill another narrow hole centrally through the lower landing plate, for affixing to tree if needed.
Drill 3 x15-18mm dia. echolocation holes 30-40mm up from box bottom, with holes being offset in the front and sides.
With the bottom bat entry plate in place, cut a notch either side, to hold the wire in place, which after one turn around the plate screw will hold it firmly up to the lower side screws. The bat entry plate can now be held firm and open, preventing it from sliding closed. Hence side screws slightly forward of centre to hold the plate open 15-20mm.
Hint: No good having a Bat box with a too narrow or too wide an entry point, or no entry at all.
The mounting wire
Drill a 7mm dia. hole approx. 150mm down from the top opening, horizontally through both sidewalls, just behind the front plate. Insert the mounting wire, right through the box and with pliers bend two open hooks for the looped ends of the webbing strap (or wire and hose method) that holds the box in the tree.
Tightly roll the carpet square, hessian side in, then slide it down till just below the top of the box.
Hint: The carpet length may need to be adjusted to fit it in, starting with carpet edge in one corner.
You may need a long shanked screw driver to push the carpet snugly into the corners as it can be quite stiff.
Congratulations, you are now a qualified member of our Bat Box building team.
Please enquire with your local Friends group for the ideal mounting location for optimal possibilities for bat habitation.
Follow safety procedures when mounting your bat box. Do not install the box while alone.


